

Bokeh Mode or Background blur got more popular with the iPhone 7 Plus which allowed users to focus on the subject with a blur on the background in its Portrait mode. With the New Dual Camera lens Smartphones coming around like Honor 8 Pro, OnePlus 5, the bokeh effect is becoming even more popular. There’s literally no need to purchase a new phone just for the sake of getting the Background Blur effect, in this tutorial we will show How you can Capture Dual Camera-like Bokeh effect photos with Background Blur on your existing single lens / single camera Smartphone.
Tutorial to Capture Bokeh Effect / Dual Camera like Photos on Single Camera Phones Android –
- To simulate Bokeh effect or lens blur, we will be using the Google Camera App for Android. We cannot capture Background blur or Portrait mode photos with the Stock camera app.
- To Install, Google Camera app on your Smartphone you can install it from the links given below –
Click here to Download & Install Google Camera app from Play Store
or
Click here to Download Google Camera Apk for Android - Once you have installed the Google Camera app from the above links, launch the app. It will now show a shoot mode screen as shown below –

Swipe from left to right to bring the Options panel Here Swipe from left to right to show all the shooting options available, as shown in the image above. In the options, available Tap and select the “Lens Blur” option as shown in the image below –
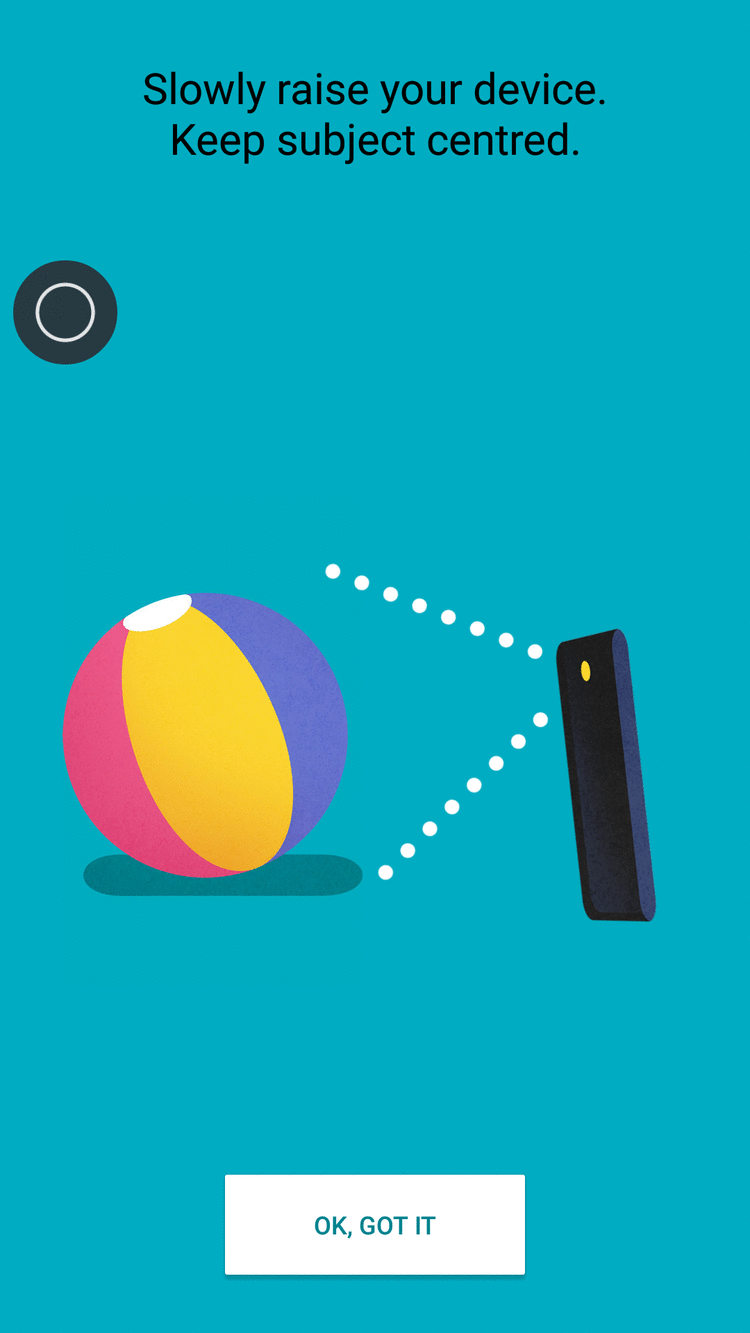
Select the Lens Blur Option in Google Camera - Once, you select the Lens Blur Option , it will show you a small tutorial on How to use the Lens Blur option to capture Bokeh effect photos as shown in the following image –

- Here click on the “OK, Got It” button. Thus, basically all you need to do is select the Lens Blur Options, and then shoot the “Object” you want to focus on while raising your phone in an angle. Let’s see how it works –
- In the Lens Blur capture screen, first tap the capture button as shown in the figure below –

Click on the Capture Button
- Now , Keep on raising your phone until the indicator shown below is full. Be as slow as possible while raising the phone, so that your focus on the object remains constant. Try not to be too fast neither too slow . Check the below screenshot for Indicator –

Indicator Box of Google Camera Lens Blur Slowly raise the phone until the above image highlighted box goes upwards as shown in the next image –
Indicator Box going upwards This takes a lot of time to get used to, hence we recommend practicing it on a stationary object before moving onto moving objects. We tried this on our Deodorant can and once we finished the tilt mode. It started focusing our captured photo as shown below – 
Processing the Captured Tilt Image At first, you might think that it hasn’t captured the bokeh background blur, but please wait until the image has been processed. Wait until the “Processing image” marker finishes.- Wow! You’re in for a surprise, the Google Camera will now display your captured Bokeh and it will look absolutely stunning as shown in the following image

Bokeh Effect on Single Lens Redmi Note 3 ? Done!! As seen in the above image the image looks stunningly beautiful and at par with the OnePlus 5 Depth effect or iPhone 7 Plus mode! . Besides, you can even change the refocus by the highlighted option. - So, this is how your Normal Single camera phone also can take beautiful bokeh background blur pictures just like Dual lens camera phones. Incase, if you have any queries or are unable to use the app feel free to comment below!
Thanks for reading. Please share this with your friends to support us.


Cool post. Going to try it on using my Android phone.
ReplyDeleteThanks for Sharing.
Yeah really nice information I am going to try it on my new galaxy a5 2017. If found any errors wil come back. Thanks for useful info...
ReplyDeleteBest Online Software Training Institute | Android Training
Really this is a very good informative post. Thank you for sharing the information.
ReplyDeleteSuch an ideal piece of blog. It’s quite interesting to read content like this. I appreciate your blog
ReplyDeleteTableau online Training
Android development Course
Data Science onine Course
Dot net Course
iOS development course
Informatica Training